Pajama pants for the kids
It’s been over five months since I blogged here, have you missed me? I sure missed you!! But just because I haven’t been blogging doesn’t mean I haven’t been busy. In fact, my busy-ness is why I haven’t been blogging. Then I got to the point where I was just overwhelmed by all of the blog posts I wanted to write. I will try to catch up, because if I can’t share the cool things I’ve done, then it’s not as satisfying to me.
My oldest kiddo had been asking me for over a year to sew him some “soft pajama pants”. The boy is totally into soft textures. I figured that as long as I was sewing pjs for him, I might as well sew them for all of the kids. Turned out that it was mostly an easy process.
Here’s how I made pajama pants for my kids (and another two pairs for a sibling pair of friends of the girls).


The first thing I did was make a pattern by taking a current pair of pajamas and tracing around them on a long piece of paper. then I added about an inch on the sides for a seam allowance, and two inches at the waistband and foot.

I chose fleece as my fabric for three reasons: 1. It doesn’t need to be hemmed, since it doesn’t fray. 2. Due to the stretch, an elastic waist isn’t needed. 3. It’s the perfect cold weather fabric.
I neglected to photograph the fabric after I cut it. To cut it, fold it in half right sides facing with the stretchy direction perpendicular to the fold. Line the pattern with the straighter side along the fold (the dip that sticks out on one side is not the side with the fold). Cut the fabric out, leaving the fold intact.

I also didn’t take a photo of the next two steps, but I will try to explain it accurately. (And if I make another pair, I will take photos of the missing steps and update this post).
Sew the inseam, from the dip of the crotch down to the leg on each of the two leg pieces.
Leave one leg with the right sides facing each other, and turn the other leg right side out. Tuck the turned leg inside the other leg and line up the leg seams you just sewed and pin from the waist to the crotch. Sew this seam to connect the two legs together and form the pants. Pull the leg from out of the other leg, and leave the pants inside out. Whew! I’m not sure how much sense that makes and I can’t find the link to the instructions I used when I made these. It almost makes me want to sew another pair just to get the pictures for this part.
I decided to use a drawstring to cinch the waist on the pants using buttonholes as the opening. First I marked where the holes would go on the front, as well as how they’d be place once the waistband was folded. I marked them equal spaces from the center seam so that they’d be even. The button holes only are going where the bottom marks are, the marks above are just to make sure that the seam that makes the waistband don’t interfere with the button holes.

Then I attached the buttonhole foot on my sewing machine, and set it up so that the buttonhole would be about ½” long. I love sewing buttonholes, it’s just so cool that it’s automatic once you have it all set up.

Check it out. I used a seam ripper to cut the fabric within the buttonhole. Now it’s time to sew the waistband.

Fold the waistband down so that the buttonholes won’t be sewn, and pin for sewing. Then with the pants inside out, sew the waistband together. The left buttonhole is lower than I had planned but it ended up working out okay.

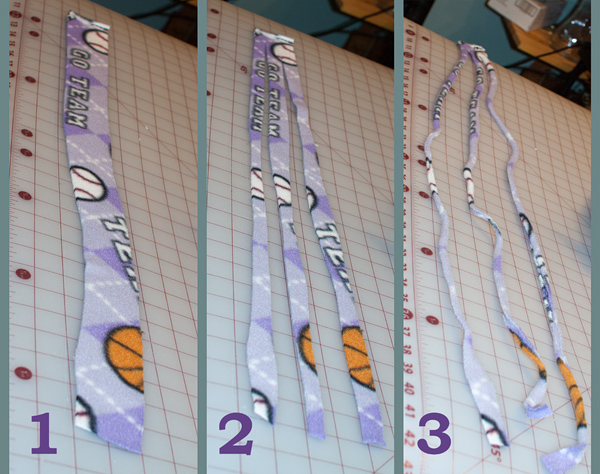
Since these were for my daughter, I decided to make a braid from some of the scraps for her drawstring. If you go this route, make sure that the stretch of your fabric goes in the long direction. I took a long scrap, and then cut it into three pieces, leaving part of it connected at the top. I then stretched each piece to get it to curl and become thinner and longer.
Then I used a clamp to attach it to a chair so that I could braid it.

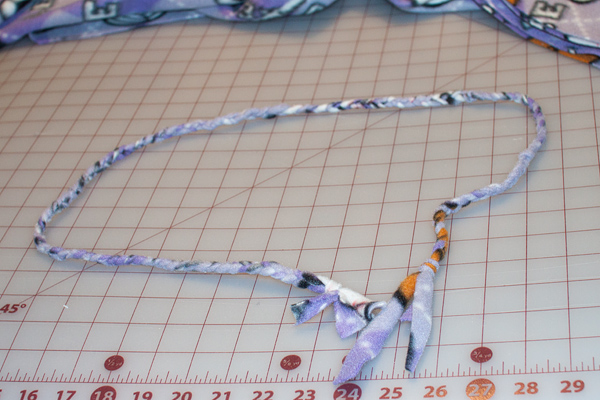
Voila! Once the braid was finished, I tied both ends, and cut off the fabric where the top was connected.
Using a safety pin, I fed the braid through one buttonhole, around the waist and out the other. I wish I had made it a little longer, just to make it easier for my daughter to tie.

The pants by themselves

And the pants I made for my other daughter. I used elastic in the waistband on these (as they were the first pair I made, and I didn’t think of the drawstring then).

For my son, I didn’t use a braid, I just used a long piece of the stretchy fleece, and tied it together.

The girls modeling their pants

And all four kids wearing their pj pants on the one night I was able to get them together for the picture

Week 52 – silent night

It’s rarely silent here, and I feel like there hasn’t been so much downtime in the last 9 days for us. It’s the last week of 2012’s Focus 52 and I decided to focus on Christmas Eve and New Year’s Eve, at moments when it was mostly silent.
This is after Santa has arrived (with lots of gifts from us, Uncle Eric, Aunt Meghan, and Grandma & Grandpa under the tree). Our elf, Gumdrop Fred, decided to pose for one last photo before his departure for the North Pole.

![]()
Fast forward a week to New Year’s Eve … the littlest member of the family didn’t make it until midnight, or even 11pm! He wouldn’t wear the hat while awake, so I snuck it on his head for the photo.

![]()
Soon after, his older sister succumbed to sleep. She was very upset this morning when she found out that she slept through the ball dropping. She decorated her 2013 crown herself, and she wore it again for a good part of the morning.

![]()
And so now it’s a new year. I’d like to do another year of 52 themed images, as it’s a good way to think about things differently than just randomly taking photos during the week. I’m hoping for a good year, with my family and friends, and lots of moments to remember together.
Thanks for spending time visiting my blog. I hope that you have a happy and wonderful new year.
—
Week 51 – brown paper packages
It’s the week before Christmas, and it’s time to wrap the gifts. For those who know me, or who have been following my blog for a while, you know that I don’t wrap with paper. I’ve been using cloth gift bags for a few years now, and every year I sew a few more to add to the collection (mainly because I don’t have bags the size I need).
The prompt this week is to capture the gifts, any way we choose. That’s how I read it, anyway. I spent yesterday morning wrapping the majority of the gifts that I have for my family. I placed them under the tree and fired up the camera. It was a very dreary day, and the light was scarce. I didn’t want to use my flash, so I set up a spot light on the ground, pointed in the direction of the tree. That’s the first time I had played with a spot light for light augmentation and I was happy with how it worked out.
In addition to the cloth bags, I also use the fronts of Christmas cards from previous years to label each gift. It’s nice to look back on the handwritten notes on the cards, before I cut the front off to use to attach to the ribbons.

![]()
I love coordinating the colors of the cards with the fabrics of the bags – I don’t do it with all of them, as the kids won’t care. But it sure looks pretty to me.

![]()
The large gift against the wall is one that my daughter is DYING to open. I sure hope she likes what’s in it. 🙂

![]()
The blue doesn’t typically say “Christmas” but I love the shimmery texture, and it says “holiday” to me.

![]()
And that’s your peek under our Christmas tree. I’m looking forward to taking the set of photos that show the joy on the faces of my children (and the adults in the family too!) on Christmas morning.
Wishing you a very Merry Christmas!!!!
Week 50 – bokeh
I had great plans for bokeh … but it was one of those weeks where I didn’t come close to getting everything done that I had wanted to. Of course, every week is like that for me, but this past week seemed faster than usual.
I really wanted to get colored lights as my blurred background (bokeh is a Japenese word that refers to blur). I ended up playing with the lights on the little tree in Jack’s room, as I built a tiny tree out of his wooden blocks.

I had to “steal” blocks to build the tree, when Jack wasn’t looking. I sent him to go get his toothbrush ready so I could steal the blocks to build the tree above.
![]()
This is how his room was when I first entered it that night. He was making a “track” with his blocks, and didn’t want me to touch any of it.

![]()
And this is the tree I was allowed to make with the few blocks he had leftover (which is why I sent him out of the room to make the tree I really wanted to make, without him having a mini-meltdown for removing track blocks).

![]()
I do like the nice bokeh of the little lights on his little tree … and if I had had more time to play, I would have done shaped bokeh instead. I’m hoping to still play with that this week, but there’s still plenty to do to get ready for Christmas this year.
Week 49 – deck the halls
This week’s prompt was timely, in that it was time to decorate the Christmas tree. With an early Thanksgiving this year, I didn’t want to have a tree up with over a week of November left. We put the tree itself up on November 29th, but we didn’t have time to decorate it before leaving town the following day to visit my husband’s family. In fact, we didn’t get the time to decorate it until the following Tuesday, December 4th.
So for six days, our family room looked like this, bare tree and storage containers emptied on the floor (thanks, kids!)

![]()
The fragile ornaments had been wrapped in tissue paper, and kept in boxes away from the rest of the ornaments. My lovely younger children took them out of their protective nests and dumped them on the floor.

![]()
I set up the camera and timer before we even started decorating the tree. This let me capture everyone decorating at different times, me included.

![]()
I loved seeing the younger two kids decorating the tree. Jack initially didn’t want to be involved in actually hanging the ornaments, claiming he didn’t know how. But luckily he got over that, and he was a big help decorating the tree.

![]()
Andrew even hung ornaments (of course, I told him that he wasn’t allowed to play his video games until the tree was done, so he did have some motivation)

![]()
Rich got in the spirit of decking the halls, and hung this garland on the mantel. I think it turned out really nice, and I’m glad he thought of it.

![]()
The tree, after everyone had gone to bed. Gumdrop Fred (our elf) was so excited about finally having the tree decorated that he climbed to the top and hung out there for almost 24 hours!

![]()
The next theme is bokeh, and I know that I am going to have a lot of fun playing with that one! 🙂
—
Week 48 – layers
When I think of layers, I think of cake and onions (not together!). Normally, having a theme like “layers” on the same week as my birthday would make it easy to get layers. Nope. I didn’t have a traditional cake this year. Mom baked me a cake on Saturday, but that was before this week started (and it was a single layer cake). On my birthday, we had cake pops. So no cake with any layers to photograph … and I wasn’t about to cut an onion just for a photo. Besides, I kind of figured that the sky was the way to go …
Driving around last night, I was wishing I had my camera. The sky was just so pretty, and there were just layers of color. So tonight I brought my camera with me when I took my oldest to gymnastics. I knew the sun would set on my way back, and the view from the ridge by our house would be beautiful. Sadly, the traffic home got me to the ridge a little later than I wanted. But I think I still captured the layers that I saw in the sky.

![]()
The Blue Ridge Mountains are in the distance. I was hoping to catch more of them to make them a layer, but I just didn’t have the light (plus new houses have been built and they definitely get in my way when I’m trying to capture the horizon).

![]()
Just imagine if we had cirrus clouds in the mix, that would have definitely made for some colorful layers in the sky!!
Week 47 – thankful
This week we’re focusing on “thankful”. I have a lot to be thankful for. I wanted to think beyond my immediate sphere of husband, kids, house, car – the things that are a part of my every day life. I am thankful for those things, and I’m sure I take a lot for granted most of the time.
Tomorrow I turn 40, and I have had a great first 40 years. I wouldn’t have had those 40 years if it wasn’t for the two people in the photo below – my parents. I am thankful for my parents. Without them, well, I wouldn’t be here. They played a bit part in shaping who I turned out to be. And thanks to them, I am aging very nicely. I certainly got the good aging genes from them. 🙂

![]()
I love that they still hold hands. We should all hold hands more often.

![]() Maybe next year, I’ll take the month of November to photograph one thing I’m thankful for every single day. I know others chose something to be thankful for each day, but it wasn’t that kind of month for me. Maybe November isn’t meant to be my thankful month, I might have to chose another month to recognize all that I’m thankful for. Or maybe I do it on the 26th day of each month – that might be a fun project to take on. There’s always time to find ways to be thankful in different ways …
Maybe next year, I’ll take the month of November to photograph one thing I’m thankful for every single day. I know others chose something to be thankful for each day, but it wasn’t that kind of month for me. Maybe November isn’t meant to be my thankful month, I might have to chose another month to recognize all that I’m thankful for. Or maybe I do it on the 26th day of each month – that might be a fun project to take on. There’s always time to find ways to be thankful in different ways …
Week 46 – remember this …
Taking this week’s prompt to a different kind of level. I’m in an interesting place right now, and have been extremely contemplative. And I want to share what I think all married couples should remember, and it is this:
No matter how long or short you’ve been married, always take the time to appreciate your husband or wife, and remember the promises you made on your wedding day.

![]() Make sure that you know your spouse, find out what makes them tick on a regular basis. Because we all change, evolve, discover new things about ourselves. New interests, new hobbies, new passions, new needs. Know those things about each other, and try to spend time doing what’s important to the person you love. And ask him or her to do those things with you, the things you hold close to your heart.
Make sure that you know your spouse, find out what makes them tick on a regular basis. Because we all change, evolve, discover new things about ourselves. New interests, new hobbies, new passions, new needs. Know those things about each other, and try to spend time doing what’s important to the person you love. And ask him or her to do those things with you, the things you hold close to your heart.

![]() I spoke the following words to my husband Rich, twelve years ago next month.
I spoke the following words to my husband Rich, twelve years ago next month.
I promise to be true to you in good times and in bad, in sickness and in health. I will love you and honor you all the days of my life.
And I have kept those promises, and will continue to do so.

![]() But I’m realizing now that loving and honoring includes much more than saying “I love you” and being together. Meeting each other’s needs on all levels is what matters. Emotional, intellectual, physical, social, spiritual, financial, mental – we each have a set of needs that have different priorities. We are not the be-all and end-all but we need to help each other realize each other’s dreams. And it’s important to remember to reach for those dreams together.
But I’m realizing now that loving and honoring includes much more than saying “I love you” and being together. Meeting each other’s needs on all levels is what matters. Emotional, intellectual, physical, social, spiritual, financial, mental – we each have a set of needs that have different priorities. We are not the be-all and end-all but we need to help each other realize each other’s dreams. And it’s important to remember to reach for those dreams together.

![]()

It’s never too soon to rediscover your spouse, but if you wait too long, it could be too late.
—
Week 45 – signs of November
Signs of November … an unusual prompt to some degree. I mean, for me it’s hard to really see November until much later in the month. And having a November birthday, I like to think of November being MY month. But I wasn’t ready to feel that the first week of this month (especially since this are the last weeks of my 30s … I enter a whole new decade at the end of the month).
But an overnight freeze helped me out with an obvious sign of November, and that’s the end of October. The jack-o-lanterns from Halloween are collapsing due to the cold and to the passing of time beyond Halloween.


![]()
The leaves on the ground are multicolored … I feel like this photograph does not do the colors justice. The way the morning sun was striking the leaves, which had originated mostly from our crepe myrtle trees, was just beautiful. And I love the contrast between the grass, which is still vibrant from all of the rain from Sandy, and the mulch which has been baked in the sun all summer, with the leaves in the crevice in between.

![]()
And November brings the last of the trees in our backyard to a fire-red display. You can see the bare branches to the left, and the branches to the right have lost more leaves than the tree in the middle. These are my favorite trees to look at in the fall, I just love the reds. It’s been a week since I took this photo and that tree is now bare, all of the leaves are on the ground, no longer a pretty red, but more of a reddish brown and waiting for the rake to pile them up for kids to jump and play …

And that is how November started out where I live…
Week 44 – spooky
Week 44 coincided with a few other things – Halloween, hurricane Sandy, and the crash of my hard drive. I’ve been trying to recover from the third ever since. I’m thankful that I paid for an online backup service. But you can’t just download a terrabyte of photos and files from the internet. I’ve spent hours trying to recover the data, and finally decided that my time was more important than money, and have paid to have my backup provider send me a drive with my files. It’s on the way, can’t wait to have it!
Meanwhile, I was able to recover my current working files via both download and connecting the bad drive temporarily (it is in the freezer, and only works for a short period of time, limiting how much I can pull from it). I am slowly working towards catching up on both photo edits and blog posts.
With that being said, here’s my Focus 52 photos from that week, along the spooky theme. 🙂
Sandy blew through our area on Tuesday October 30th. She managed to blow down my metal skeletons in the front yard (my 6 year old thought spider webs would be a good idea on the skeletons this year). This poor guy was seriously leaning the morning after Sandy. I righted him to his normal “standing” position after I photographed him.

![]()
The spider managed to stay put in the tree through the strong winds and rain. Meanwhile, the fake web didn’t fare as well. It caught some leaves, and was also pushed back closer to the tree. It was kind of a mess, actually.

![]()
And this spooky site belongs to one of the neighbors in the pipestem by our house. My younger kids refuse to trick-or-treat there because they’re always scared of the place. I ran back over there once I was done walking the kids around, as I wanted to capture it while the lights were still on. I love the skeleton in the tree, and the scary bat thing hanging from the light post. But what I love most of all is the light coming from the jack-0-lantern, such a wonderful accident in this photo captured at night (no flash, and I stood very still so that I could get a slower shutter speed to try to get it all).


